
7 Steps to Creating Your Own Outdoor Barbecue Area for Summer Entertaining
Outdoor barbecue setups can be as simple as a pit with coal in the back of your garden, or a small portable grill surrounded by chairs. For a more complete system, they can include sleek gas grills, sinks, refrigerators, and work tops designed for outdoor food preparation. If you have some basic brick-laying and carpentry know-how, have time to spare on the weekends, and are ready to get creative—and most likely sweaty—then here's how you can build your own top-of-the-line outdoor BBQ area.
Choose Your Grill
The first step is deciding on your cooking appliances. Gas grills are one of the most modern and attractive options for state-of-the-art outdoor cooking. Brands such as Genier’s Appliances, Weber, and Napoleon offer power-packed choices with modern, streamlined designs. Weber's Genesis II LX E-640 Gas Grill with six burners is ideal for large parties.
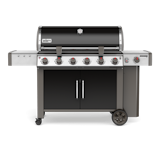
Weber Genesis II LX E-640 Gas Grill
Choose the Appliances to Accompany the Grill
Home Depot offers a wide selection of outdoor sinks, island counters, mini-refrigerators, bars, and storage options for outdoor barbecue areas. They also have a great selection of high-end islands that hold multiple appliances and are topped with tile, stone, or stucco.
Laying the Ground
Decide on the site in your backyard—preferably a spot with access to water, power and gas lines, and drainage. Dig and level the patch of ground that will be the foundation of your BBQ area. Line the perimeter of the BBQ "plot" with wooden slats to keep the concrete from flowing out of the designated area, then pour and level the cement into the space within the slats. Wait for it to dry, then remove the slats.
Laying the Cinder Blocks
With the measurements of the grill and other appliances in mind, pick up some rebars, cement epoxy, and cinder blocks. After drilling holes in the concrete, embed the rebars securely to the concrete foundation with the epoxy. Next, stack up the cinder blocks around the now secured rebars, and leave openings for the grill in the front. Use a brace to support the middle brick above the door.
Building a Countertop
Make sure your water and electrical lines are where they need to be, and that your measurements for the grill, doors, and other fixtures are correct. Using sturdy plywood, create a form, which will wrap around the top of the cinder block structure. Pour the cement within the form, level it, and wait for it to dry.

Adding the Finishing Touches
Mix and trowel stucco onto the sides of the cinderblock structure. Using tile glue and a trowel, lay tiles or stone slates onto the countertop, laying the edge tiles first before proceeding with the tiles around the perimeter of the countertop surface. If desired, you can also add doors onto the front to cover electrical and water lines with hinges and handles made of wood or metal.
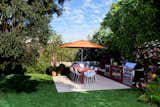
Consider Sheltering the Area
If you want to ensure that your BBQ can happen in both rain or shine, then build or install a roof or awning above your grilling area.
Published
Last Updated
Get the Dwell Newsletter
Be the first to see our latest home tours, design news, and more.