DIY Project: How to Build Your Own Modern Outhouse
In fact, outhouses are generally relegated out of sight and thought to be solely utilitarian. Below, we show you how to build one that you’ll be proud of—and will even want your guests to experience. To illustrate the process, we'll be showing you The Cube, an off-the-grid pit toilet that was hand-built in California's Santa Cruz Mountains. This project is perfect for anyone who has a large piece of land that's far from their house and has visitors enjoying the property on a regular basis.
Story and tips shared by Jeff Waldman, who is responsible for building this outhouse, along with his girlfriend and friends.
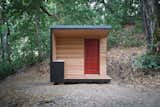
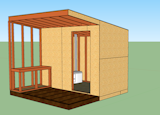
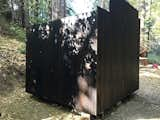
The Cube's defined lines stand in stark contrast against the raw landscape of tangled vines and rolling hills. It sits five miles from the coast on 10 acres in the Santa Cruz Mountains and is surrounded by towering redwoods and twisted oak trees.
Step 1: Decide if an outhouse is right for your needs.
A pit latrine is a cheap and ecologically friendly solution. It’s considered to be non-permanent infrastructure, and contrary to what you might see in the high-traffic restrooms of your local park, they aren’t all offensive. A septic system is costly and installing a vault toilet adds a level of complication, cost, and commitment. With a traditional pit toilet, you cover the hole and move to a new location. It’s simple and effective. A hole that’s three feet wide and five feet deep will last five years for a family of six. If that sounds right for your needs, then read on.
Step 2: Pick a spot that’s downwind and away from any wells or water sources.
Avoid low-lying depressions where your pit might fill with groundwater.

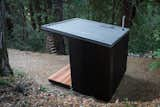
Shown here is the final result of The Cube, minus the mirror that will hang over the sink. Proper pit toilet design requires no windows, unfortunately. The mirror, aside from being functional, will add depth and give the facade the feeling that there's a window. Plus, what's a sink without a mirror over it?
Step 3: Dig a hole.
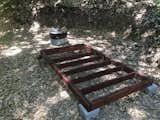
You can do this by hand, but if you can rent a backhoe, it would be a lot quicker. You’ll need to shore up the hole with wood or other materials and cap the top of it in a way that connects it perfectly to the outhouse. You can pour a traditional concrete pad, for which there are a lot of resources online. But in this case, an old piece of galvanized culvert was extended from the hole into the foundation of the outhouse.
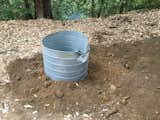
After cleaning up the hole, you can shore the top of it with an old piece of 32-inch diameter galvanized culvert that you can pick up at your local rebuilding center for cheap, and fill in around it.
Step 4: Find or create a building to sit over that hole.
This particular outhouse was designed with SketchUp, a free software used by builders around the world. But a simple outhouse can be designed on paper with some basic knowledge of building construction. The Visual Handbook of Building and Remodeling can also help you figure out how to properly build everything.
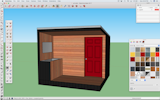
Design for the cube was done in Sketchup.
Step 5: Think about the details.
Ensure that there’s enough room in your layout for the toilet, a ventilation tube, some storage for toiletries, and maybe a coat hook. You’ll also need a door. Make sure you pick one out ahead of time, since it will tell you the rough dimensions you’ll need to frame it.
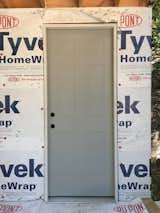
Waldman and team got the cheapest door they could find at Home Depot. It was a particularly thin metal gauge they were clearing out. There were other used options at the rebuilding center for even less, but having never done this before they opted for the presumed ease of a pre-hung, new door.
Make sure your design allows for the door to open without it getting in the way. You can include a window or two, but you should know that some of the best outhouses don’t use them. A limited amount of diffused light is okay, but the theory of pit latrine design is that flies and other insects that find their way into the pit will try and leave via the ventilation tube, if that’s the only natural light source. If you opt for no windows, there are dozens of stand-alone solar light kits available for less than $50, where no electrical know-how is required.
Step 6: Consider a sink.
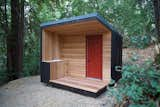
You probably want a sink. However, you might find the fresh air and natural light more enjoyable. We opted to install a sink under the protection of the roof, but just outside the toilet. It gets its water from a garden hose hookup and drains the small amount of gray water we produce into the trees on the hillside.
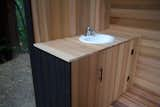
The raw cedar came from Craigslist and the sink was reclaimed from the local rebuilding center. The faucet is by Kohler.
Step 7: Define your design palette.
The design palette of your outhouse can go in a variety of directions. The fortunate thing about building on such a small scale is the low cost of materials. While the difference in price between a cheap siding and an expensive one would be extraordinary on a home, on a building that’s less than 100 square feet, it’s a minor difference. This affords even the most modest builder a chance to spread their design wings and experiment without breaking the bank. If there’s a home design you’ve always enjoyed, this is your chance to replicate some of its look on a budget.
The goal with this outhouse was to build a structure that would stand in stark contrast to the landscape when you're looking right at it—sharp lines, a red door, uniform siding—but one that could easily be lost in the thicket when viewed from afar. The cedar siding is blackened with Scandinavian pine tar and blends in with the 10-foot-wide charred-redwood stumps that dot the property—relics of the old-growth logging 100 years ago.

The interior was designed to feel like you walked through a portal into a home.
Once designed, you can start construction.
Step 8: Build a foundation from pressure-treated wood and rest it on cement deck blocks.
Keeping it off the ground will prevent rot and allow you to fit skids or rollers under it in a few years if you wish to move it to a new location. You’ll need two holes in your flooring that open into the pit, one for the toilet riser to slot into and one for a ventilation tube. Ensure that the foundation meets the hole without any gaps. Seal it up with silicon.
Try framing, sheathing, and wrapping the walled-in portion as one structure, so that it will be sealed against the elements. Then, the porch and side wall can be added from there.
Step 9: Frame your walls and build out the roof.
Sheath it in OSB plywood and wrap it in Tyvek or a similar material. Windows and doors will go in next.

You can wrap the whole structure in Tyvek. For The Cube, Waldman used the manufacturer-recommended, plastic-capped nails, but they proved to be a pain. They got in the way of a lot of furring strips and were a problem in the recessed area in front where the siding was attached directly to the sheathing. He ended up pulling a lot of the caps and taping over the nails. He's thinking that he may be able to get away with just staples in the future.
Step 10: Install some type of siding.
There’s a lot of good wood options. Metal siding is cheap and easy. There are also some plastic panels that can work well. Trim will go over the gaps where the doors and windows meet the siding.
For the cube, the siding is a knotty, low-grade cedar, which is usually the cheapest cedar at the lumber yard. Waldman coated all the siding (front and back) with Swedish pine tar made by Auson. Pine tar is a traditional Scandinavian wood preservation treatment that's been used for a millennia or so. You mix it 50/50 with linseed oil and brush it on with a rag. Let it dry for a few days and you're good to go. It's non-toxic, incredibly durable, and frankly, when coupled with cedar, much more long-lasting than this structure deserves.
Step 11: For the roofing, lay down tar paper, followed by the roofing material and trim.
There are plenty of guides for this, but the general principle is that you want to allow water to shed, so everything needs to be laid down in layers—the lowest first and working your way up in height. At every stage, you should ask, if water gets to this point, where will it go. Water finds a way. Corrugated or standing seam metal roofing is great for its simplicity, but tiles or shingles also work well.
For the roofing felt, Waldman used a 30# roofing paper, layered from bottom to top, with regular roofing nails. The paper overhung the edges of the siding and was capped with the roof flashing. The bottom piece of eave flashing that covered the lowest part of the roof was installed first with roofing nails. The tar paper then lays on top of that. All the metal roofing came from a company called Metal Sales, and sold by a local distributor. Panels were cut to length by the vendor, but Waldman had to rip one to width with an angle grinder and trim the flashing with tin snips.
Step 12: Install vents in the walls from the interior to the exterior.
This will keep the building from getting too humid and is integral to ventilating your pit. Your ventilation tube will funnel air from the pit, up and out of the building. It does this passively thanks to passing breezes, the difference in pressure that it produces, and rising warm air in the tube. Painting the tube black exacerbates this effect. You can also actively ventilate it with a solar fan. In either case, the air drawn up the tube comes from the pit, which is drawn into the pit through the toilet, and that air comes from—you guessed it—the vents you installed in your walls. Do all of this correctly and you’ll hardly notice a single offensive odor.
Step 13: Buy a toilet—and the right kind.
All traditional toilets are set up for plumbing and won’t work, so you’ll need to buy a dry toilet riser, which is basically a hollow tub with a toilet seat that’s made for exactly this purpose. This one was purchased before construction so that the exact hole could be cut into the flooring. The toilet slotted right in. Composting toilets are also a great option as they won't require water and, because they allow you to remove waste with relative ease, you won't ever have to relocate your structure.
Step 14: Decide on your interior walls.
They can just be plywood, or a whitewashed plywood provides a clean and modern look. This particular example is painted white. If you paint your walls, take the time to putty over the screws and sand the blemishes. It’s a minor amount of work that produces a much more finished, clean look.
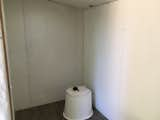
Here, the interior walls are going up. The left wall is given lauan plywood (since it's going to be covered in wallpaper) and the other walls are covered in beadboard.
Step 15: Consider decor.
When it comes to decor, remember that this is a small area, so keep it simple. Add a few touches that make it special, but don’t clutter the space. In this particular example, there’s a simple storage cabinet. The toilet paper roll is a wall-mounted piece of madrone wood from a tree that fell last winter. One accent wall is finished with wallpaper by Andrea Lauren on Etsy. The sink area includes soap by Juniper Ridge and a Turkish towel from Longest Thread on Etsy. The mirror is a stainless, commercial model that was cheap and should last in the outdoor elements. Just think about the essentials, including small unique touches and simple necessities that won’t clutter or overwhelm the space.

The toilet paper holder is a piece of a madrone tree. Waldman and team installed a bear wallpaper by Andrea Lauren on Etsy. Make sure to dust and clean the wall extremely well before installing wallpaper, and use one of those $1 plastic scrapers to work the air bubbles out.
Why make one?
If you’ve never built anything like this before, an outhouse is a practical solution to a need for a bathroom, but also a wonderful chance to dabble in design and construction. Keep it interesting, keep it light, and don’t get caught up in the minutiae. This is a low-impact project and a chance to have some fun. No one expects an outhouse to surprise and delight, and the expectation for one is a low—and often grotesque—standard. Any smartly designed and reasonably well-built structure will be well-received and is the perfect platform to dip your toe into structure design.
It’s also an opportunity to experiment with materials and methods on a small scale before one day doing a larger project, like a house or cabin. The footprint is small, the impact is minimal, and by design, it’s temporary. In a few years, if you don’t choose to simply relocate the old structure, you have the opportunity to break out the sketchpad and start anew.
Published
Last Updated
Get the Dwell Newsletter
Be the first to see our latest home tours, design news, and more.