Collection by Jordan Kushins
Bookbinding
For those who adore the beauty of a blank-page-in-waiting, behold! The incredible allure of a hardback book you make yourself is just too damn much to resist.
This project was inspired by a friend, Daniel Tadiarca. Daniel is the kind of guy for whom crafts come easy. He shared his vast maker knowledge with me and helped me with this how-to.
Making a signature.
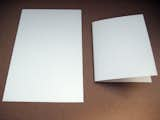
How big do you want your book? I cut my 9"x"12" sheets in half widthwise, then folded those in half to make a compact 4.5"x6". This folded sheet represents the size of your tome! Cut, fold, and collect five of these pages—one within the other, totaling ten pages—and you've got a signature. For this scale, five signatures is just about right.
You'll eventually need two of these folded leafs for your endsheets, so set a pair aside for later.
The edges of the middle pages of the signature will stick out farther than the outer ones and you'll have a chance to trim these pages later on if you want.
All of the signatures together form a book block.
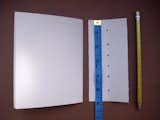
Take an extra sheet of (folded) paper whose spine is the same length as your signature. Along the fold, mark out six dots with your pencil: The first and last marks should be about 3/4 of an inch from the edge; the next two marks, each an inch inward from the first; and then the last two marks, 3/4 inch inward from those.
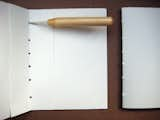
Line the template up against each signature and use the awl to poke holes at each mark that you've made, all along the fold. This will ensure that the holes line up when you are threading the pages.
Measure out a length of thread that is as long as the spine times the number of signatures you plan to have. For example, our spine was six inches, times our five signatures, equals a 30-inch-long thread.
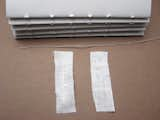
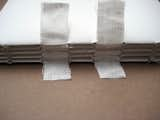
In addition to the thread, cut two short strips from your loose cloth. These will need to fit widthwise between the holes in your signature, and wrap around the thickness of your book block. Ours were each about .75" wide and 1.5" long.
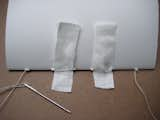
Tie a knot near to the end of your thread, leaving a couple inch-long tail. To sew the first signature, start into the first hole from the outside, then out the second, into the third and out the fourth, then into the fifth and out of the last hole, being careful to pull the thread tightly, but not so tight as to rip the paper. Take your 2 short strips of cloth and place them under the thread between holes two and three, and then four and five, so that the strips are held in place by the thread.
Line up the next signature on top of the first. You'll sew this one in the opposite order of the first; so it's in the last hole, out the fifth, in the fourth, out the third, in the second and out the first. Take care to keep the strips of cloth between holes two and three, and four and five, again using the thread to secure them in place.
When you get to the last hole, secure the first signature to the second by tying a close knot between the tail you left from the previous step to the length of thread remaining.
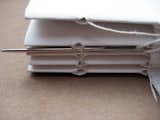
Begin the process again, attaching signature three to two. When you get to the end, you'll need to tackle a kettle stich. Ready? Here goes.
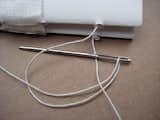
This picture shows a completed kettle stitch and one in progress.
Step by step.
Pass the thread beneath the stitch running between the two previous signatures. Pull the needle through, but the thread shouldn't be taut.
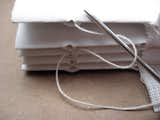
Almost there! Thread the needle through the slack you left in the previous step.
Pull the needle through, taut (it's still slack here to orient where the thread should be), and you're dunzo. Phew. Nice one. You've now successfully completed a kettle stitch. Once you've got all the signatures together, tie the end off and trim your thread.
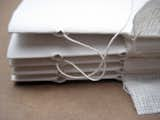
Here's your book block, all kettle-stitched together and looking damn good. At this point, you can take a ruler and a pen knife or scissors and trim the edges of the signatures to be flush with each other, but I like the variegated look so I opted out.

Clamp the book block between two pieces of hard board with just a little of the spine sticking out. Take the glue and generously apply it along the length of the spine—even over the strips of cloth—but be careful not to let it seep between the signatures. Set this aside to dry.
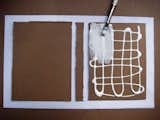
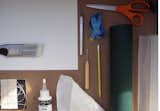
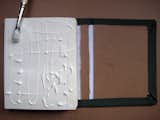
While the spinal glue is drying, it's time to start working on the cover. This pic shows a few steps.
First, cut out two pieces of board the same width as your pages, and about 1/4 inch longer than your page on either end (ours was 4.5"x6.5"). Also, cut out a narrow piece of board the same length as the other boards (6.5") and the same width as the spine of the book block (1" for us).
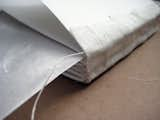
Lay these out on a flat surface. You're going to want to cut your heavy paper or paper-backed cloth a little bit larger than these boards together, taking care to add about .25" gutter space between each board and the spine, which allow for a sort of hinge when the book is done. This pic shows the paper-backed-cloth face down, with the two covers and spine on top.
Using the brush, spread glue thinly and evenly on each board.
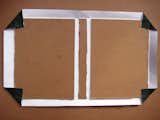
Flip your gluey boards over onto the paper side of your cover and press the material firmly to get rid of any bubbles.Brush glue on the inside edges of your cover and fold them over.
Brush glue along the remaining edges and fold over. Set this aside to dry flat.
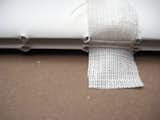
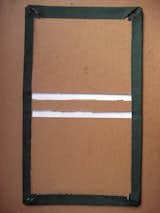
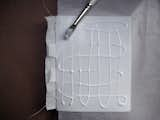
And now, back to the book block: Take your loosely woven cloth and cut a swatch that is just shy of the length of your spine, and wide enough that it will wrap your block with approximately .5" on either side of the spine.
After the initial gluing has dried, take this strip and place it along the spine. Apply glue (not as liberally as before!) again so that it seeps through the cloth, but only along the spine. Take care that the glue doesn't get on the front or back of the book block. Again, set it aside to dry.
After that strip of cloth has dried, take your book block out and have a look, You're almost there! Slip a sheet of wax paper underneath the top leaf of the top signature (so your pages don't get stuck together), and apply a layer of glue.
Now, remember those endsheets you set aside waaay back at the beginning of this project? It's time to bring 'em back. Take one, and align it on the glued sheet from the book block. Once it's on there, glue the cloth down on the outer layer. Flip your block over and repeat on the other side.
When the endsheets are dry, brush glue onto the enddsheet (it's helpful to do one side and then the other, rather than trying to glue both at once). Align the spine along the length of the cover. Do the same to the other side, gluing the other endsheet to the back cover.
DON'T glue the spine!!
The cover should overlap the pages by about an 1/8 inch on each edge except the spine.
3 more saves