Bookbinding
While the spinal glue is drying, it's time to start working on the cover. This pic shows a few steps.
First, cut out two pieces of board the same width as your pages, and about 1/4 inch longer than your page on either end (ours was 4.5"x6.5"). Also, cut out a narrow piece of board the same length as the other boards (6.5") and the same width as the spine of the book block (1" for us).
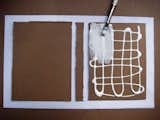
Lay these out on a flat surface. You're going to want to cut your heavy paper or paper-backed cloth a little bit larger than these boards together, taking care to add about .25" gutter space between each board and the spine, which allow for a sort of hinge when the book is done. This pic shows the paper-backed-cloth face down, with the two covers and spine on top.
Using the brush, spread glue thinly and evenly on each board.