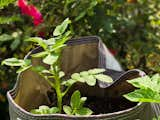
Grow Bags Are the Easiest Way to Transform Your Garden
If you’re thinking about starting an outdoor garden, grow bags are the way to go. My partner and I planted our first garden last year, digging up part of our backyard and hammering together a series of raised beds—a sweaty, labor-intensive process that ended up looking less attractive than we’d hoped—which is why this year we planted the majority of our garden in eco-friendly fabric grow bags.
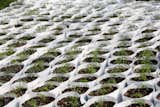
These flexible, reusable planting bags come in different shapes, sizes and colors—some are as small as a typical planter, for example, while others are as large as a child’s wading pool— and are designed to turn nearly any outdoor space, from a lumpy lawn to a tiny apartment balcony, into a fully-functional garden. We’ve got 13 grow bags in our backyard right now, including an eight-segment bag that we’re using to grow a variety of lettuce.
We’re already pretty sure we’re going to reuse our grow bags next year, and we may even add a few more—which is why I asked Allison Vallin Kostovick, an organic gardener who runs the popular educational website Finch + Folly, how other gardeners can use grow bags to transform their outdoor space.
"I am a huge fan of grow bags," Kostovick explains. "They are a real game changer in terms of garden growing success no matter what size space you have. Plus, they are probably the most affordable way to grow. I use mine to grow everything from trellised tomatoes and pole beans to potatoes and lettuce and everything in between."
Kostovick, who is the author of The Garden Maker's Book of Wonder, has been offering garden advice for the past 25 years—and she answered all of my questions about to make a grow-bag garden grow, including a few suggestions on how to keep the rabbits out of our spinach and the birds away from our arugula.
Pick plants that are likely to thrive
When you’re thinking about where to place your grow bags, start by asking yourself what you want to grow. As Kostovick reminded us, some plants are sun lovers and other plants are shade lovers—and picking your plants will help you determine where to put your bags.
"Tomatoes, for example, will want to bask in as much sun as possible, so look for a spot that gets at least eight hours of full sun," Kostovick says. "If you plan on growing salad fixings like lettuce and radishes, then ideally place your grow bag in a partially-shady spot, one that gets good morning sun, but offers afternoon shade."
It’s also important to choose plants that you can easily manage—especially since some plants have special growing needs. "Some kinds of tomatoes or pole beans require trellises," Kostovick explains. Plants also have different watering needs, and some may require more supplementary water than you have time to provide. "Some plants, like peppers and pumpkins, need more water during their flowering and fruiting stage, while others like garlic need a relief from watering during their last two weeks of growth."
Depending on your location and schedule, you may have plenty of plant choices—but if you’re working with a perpetually shady patio, an always-sunny deck or an exceptionally busy job, you may need to limit yourself to plants that are likely to thrive. Remember, you can always supplement your garden with supermarket lettuce or farmers’ market tomatoes!
Avoid putting your grow bags in damp, drippy spots
In addition to sun, you’ll need to think about rain—and, more importantly, puddles. Placing your grow bags in a spot where they can benefit from a good rainfall is nice but not necessary, since you can always top off your dry plants with a hose or watering can. On the other hand—the one that isn’t holding the watering can—try to avoid putting your grow bags in a space that might end up with a lot of stagnant water. Backyards, patios and balconies all have places where puddles tend to form, so keep your bags away from these damp, drippy spots.
"Place your bag in a spot that will allow for good drainage and not in an area where water can pool up and cause the bag to become waterlogged," Kostovick advises.
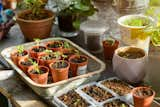
Choose your soil carefully

After you’ve picked your plants and identified the best places to put them, it’s time to start shopping for soil. "One of the biggest keys to good growing success is in the quality of your soil that you’re using in the bags," Kostovick explains. "You’ll want to use a soil that is well-draining, but still offers some kind of good water retention so it doesn’t dry out too quickly. Look for a potting mix that is rich in compost, vermiculite and coconut coir."
As with most products, you get what you pay for—and I know from experience that cheap soil is unlikely to yield much growth. You’ll also want to think about fertilizer, especially if you are growing high-maintenance plants that need the extra nutrition. "The timing of when to feed your plants and how much fertilizer to use varies with each specific plant," says Kostovick.
Do your research before you get started, and buy the best soil and fertilizer you can afford. If fancy dirt is out of your price range, look for plants that are likely to be happy anywhere, like fennel or lavender.
Move your bags to help things grow
Unlike traditionally planted gardens or raised beds, grow bags are designed to be mobile—so take advantage of the ability to move your bags around your space as you learn which plants thrive best in which areas.
You can also reposition your grow bags to follow the sunlight. "One of my favorite things about gardening with grow bags is that if your sunny areas change throughout the growing season, I can simply drag them to a sunnier location," says Kostovick. "Just avoid dragging your grow bags across sharp things that could potentially rip the bag!"
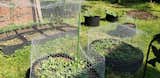
Outsmart—and outsmell—your local wildlife
As soon as your garden begins to grow, be prepared for birds, squirrels, chipmunks and rabbits to try to eat your seedlings—and be ready to keep them away from your tender young plants.
"To help keep birds, squirrels and chipmunks away from your garden, you can try a few different options," Kostovick explains. "You can apply a barrier of some sorts over your bag. Chicken wire, bird netting or fabric row covers are all good choices. Hanging reflective tape or old CDs near the bags also helps to deter pests, since they don’t like the bright, shiny surfaces."
That said, there may be better ways to keep critters and bugs away—especially if you don’t want to use old CDs as part of your garden decor. "Personally, my favorite approach is to practice companion planting," says Kostivick. "I try to partner whatever I am planting in my grow bag with another plant that naturally helps deter pests."
If you’re planting kale and broccoli, for example, put some chives in the bag as well. "The strong scent of the chives helps hide the delicious kale and broccoli the animals are looking to dine on." Other aromatic herbs, including oregano, thyme and rosemary, work well as companion plants—and if you pick culinary herbs, you can harvest a few leaves at a time to add a little extra spice to your salads and stews.
Use this year to plan for next year
Your first garden is like your first pancake. It might taste just fine—especially if you’re growing herbs and vegetables—but you’ll probably do better the second time around. That’s why Kostovick suggests keeping a gardening journal, and using what you learn this year to plan for next year's garden. "Take notes throughout the season," Kostovick advises. "Keeping a garden journal helps you keep track of what grew well and what didn’t."
You can also use your garden journal to evaluate what might have gotten in the way of your plants’ growth, from an unexpected drought to a particularly clever squirrel—and you can use your journal to keep track of your own growth as well. "Write down what you enjoyed," says Kostovick, "as well as the parts that weren’t as exciting. Use this info when planning your garden for next spring, and you’ll be off to a great start on a bountiful season ahead."
Related Reading:
A Pollinator Garden Is the Perfect Solution for Small Spaces
Top image: Marianne Lee/Design Pics/Getty
Published
Last Updated
Get the Dwell Newsletter
Be the first to see our latest home tours, design news, and more.