
Dwell Made Presents: DIY Walnut Dining Table
In this episode of Dwell Made, Ben Uyeda of HomeMade Modern makes a solid, live-edge walnut dining table out of wood from WoodSlabs.com. The table top is biscuit-jointed and glued together with a hairpin leg base. This simple, modern DIY project presents a more affordable option than most store-bought tables of a similar quality and size—check out the video below, then keep scrolling for detailed directions.
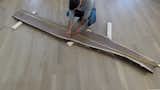
I ordered a one-inch thick slab that was about 11 feet long. I cut it in half to make two slabs, each about 5’ 6" long. Cutting a slab like this always makes me a bit nervous, so I took my time to plan out the table, and I put a brand new finish blade from Diablo in my circular saw so that my cuts would be nice and clean.
Step 2: Rip the Slabs
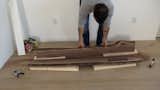
I clamped down a straight edge and ripped the first slab in half. This slab will be used for the edges of the table.
I trimmed the long live edges off of the second slab so that I have a nice, clean piece to use for the middle of the table. I really wanted to minimize waste, so I left part of the sloped edge and decided to use that on the underside. This means I will have less surface for the glue up in that area, but the table will still be plenty strong.
Step 3: Biscuit Join the Slabs
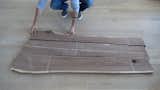
I used my Ryobi biscuit jointer to cut slots in the walnut slabs, and then did a test fit with biscuits. The biscuits provide strength to the glue joint, but the real value is that they keep the slabs level under the pressure of the clamps. I used a pencil to draw matching marks so that my biscuit slots would align and used #20 biscuits.
Step 4: Glue the Table Top Together
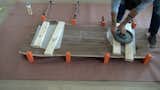
I applied wood glue to the edges of the walnut slabs and in the biscuit slots. I clamped the boards together with four long bar clamps. I placed heavy weights on the boards to keep them flat. I put down pieces of waxed paper to keep the boards and weights from sticking.
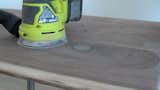
Step 5: Trim and Sand

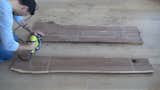
I used my circular saw to trim the short edges of the table top. I used my orbital sander with 120 grit paper to sand the table top. I removed the scratches and marks first. I then rounded over the live edges. I did this by eye and tried to make the edges nice and smooth while keeping some of the original natural contours. I then finish sanded the top with 220 grit paper.
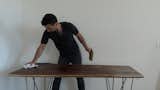
Step 6: Add Legs
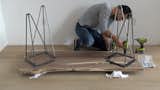
I placed some rags on some two-by-fours so that the smooth table top wouldn’t get scratched. I placed these heavy duty hairpin legs on the table. I chose these particular legs because they have larger than usual brackets that provide additional strength. I pre-drilled the holes to prevent splitting but was careful to make sure I didn’t drill through the top of the table. I used three-quarter-inch long pan head screws. If you don’t have a biscuit joiner, you could get away using these legs and a few steel mending plates to provide reinforcement. A glued up table top with mending plates but no biscuits would be strong enough, but it would be harder to get the glue up even.
Step 7: Fill In the Cracks and Knot Holes
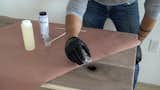
Real wood has flaws, and this walnut slab was no exception. Some of these cracks went all the way through, so I applied blue painter's tape to the underside of the table before filling in the voids with clear table top resin. I used my kiwi knife and a vacuum cleaner to clean out the knot holes and mixed this two-part resin and poured it right into the holes. For the thin cracks, I applied blue painter's tape to the top and then cut slits in it to pour the resin. I did this to keep the resin off the wood and minimize additional sanding.
Step 8: Sand the Resin
I poured a little too much resin in, and so I needed to sand it down flush. I waited four days to do this, since sanding not fully cured resin can make a gummy mess. I used 220 grit pads and the resin looked a bit cloudy, but that will clear up when I add the poly clear coat.
Step 9: Seal the Table Top
I used four coats of rag applied Minwax Wipe-On Poly to seal the table top. I sanded in between the coats.


Get the Dwell Newsletter
Be the first to see our latest home tours, design news, and more.