
Can Chalk Paint Ever Be Chic?
What’s the first thing you think of when you think of "chalk paint"? If you’re (relatively) normal and do not spend hours of your life watching HGTV or thinking about homes, as I do as an occupational hazard, then the answer is probably "nothing." But, if you have a passing familiarity with Joanna Gaines’s decorating style or have seen an episode of Flea Market Flip, then you probably know what it looks like. Imagine a vintage chifferobe rescued from the dark recesses of someone’s barn, refurbished and refinished and ready for a new life, covered in a light-colored, matte-finish paint, then "distressed" to a degree where the thing looks old, but in a different way than it did before. It’s not the most attractive finish for a piece of furniture, but it is a specific aesthetic—and one that, I’m sorry to say, is rarely associated with "good" design.
Reputation aside, chalk paint is a remarkably versatile medium. Not to be confused with chalkboard paint, which is an entirely different kettle of fish, chalk paint (invented by British designer Annie Sloan in 1990), is a matte-finish, chalky, water-based paint that is as low maintenance as any paint can be. Unlike latex paint, you don’t need to prep the surface of your piece before you paint it, so there’s no need for stripping, priming, or anything else. All you need is a few hours and a vision. And because of this medium’s ease of use, it was very appealing to me and my (low) tolerance for DIY projects that are overly-complicated and require extensive technical knowhow. When I started looking into chalk paint as a means of scratching a very specific DIY itch, our Executive Editor Kate posed a question that has haunted me for weeks: can chalk paint actually be chic? My doubts were only in my ability and not in the paint itself. I was up for the challenge and ready to find out.
Homing in on my vision
It was very tempting to plan a large-scale project—my bed frame (hideous) or my battered Ikea BILLY shelf on its very last legs—but for once, I exercised something akin to restraint. For my victim, I selected a particularly ugly, honey-colored wooden stool that has been serving as a spot for a beloved lamp in my living room, replacing the side table that was just the right height for the cat to use as a launching pad to access the television. The stool was inoffensive, but was directly in my line of vision when I sat on the sofa, and so I felt compelled to take matters into my own hands.
Since I was spending my own money on this, I spent a lot of time thinking about color choice. After much deliberation and what felt like hours spent on Annie Sloan’s very comprehensive website, I narrowed it down to two options: Old Violet, a dusty purpley-blue, and Capri Pink, a neon-adjacent magenta. (Tragically, Frida Blue was not available when I embarked on this journey, but if it had been, that’s what I would’ve picked.) Old Violet was a little too close to the cool tones that dominate my living room. My personal philosophy is that neons can and should function as neutrals, so Capri Pink was the winner. After 15 minutes of chat and deliberation at the Painted Swan in Brooklyn and then a visit to the hardware store across the street, I waddled home with a liter of paint, sandpaper (for lightly sanding in between coats), a plastic drop cloth, some brushes, and two tins of a high-gloss polycrylic (a water-based, clear finish top coat)—all the materials I needed to make my dreams come true.
(Technically, many chalk painted pieces are finished with a wax that transforms the finish from matte and, uh, chalky, to something smoother and satin. I did not want this. I wanted high-shine, lacquer, glamor, and elegance.)
I’m an artist?
Once I got home, I secured my surroundings, spreading the dropcloth on the kitchen floor and removing the cat from the general premises. To prep the stool for its makeover, I sprayed it with Dawn Platinum Powerwash (my preferred cleaning solution, it’s incredible, it’s not just for dishes, and this is not an ad), and then scrubbed until the surface felt smooth, clean and not greasy. Once it was dry, I popped the paint tin open, tentatively dipped my brush in and got to painting.
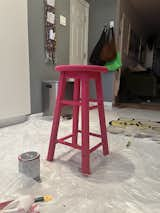
If you look closely (please don't), you can see the streaks on the legs.
The process was both self-explanatory and relatively easy, but there are some things that I wish I’d done differently. For starters, the paint was thick and a teensy bit gloopy; after some quick research, I learned that I should’ve mixed a little water into it for better control. Also, brush choice matters; I’m cheap and got a brush that frankly sucked, so my application left a little to be desired. The key with chalk paint is confidence: each coat of paint should be thin and there’s no need to go over the spot you just painted again and again, in an attempt to perfect it. But repeatedly going over the same spot you just painted will leave visible brushstrokes, and as that wasn’t quite the vibe I was after, I tried my best to avoid it.
Another benefit is that chalk paint dries very quickly; I found that the top of the stool was dry to the touch maybe 15 minutes or so after I’d moved on to the finicky legs and rails. I resisted the urge to slap on a second coat the same day I’d commenced this project, and so after I’d sufficiently painted the stool to my liking, I let it hang out in the kitchen overnight.
Patience is a virtue…
General advice that I consulted online said that I should sand the piece in between coats, but I was confident enough in my application that I skipped this step. (Also, I made the mistake of going into the hardware store without eating lunch beforehand, and got the wrong kind of sandpaper. You should use a 200 grit sandpaper sheet for this crucial step, unless you want a distressed look.)
Giving the stool a second coat of paint proved to be trickier than I’d anticipated; because my initial application was a little gloopy and thicker than it should’ve been in some parts, when I started painting the second coat (thinned out a little bit with water this time), I noticed that the drag of the crappy brush I used actually lifted some of the paint I’d initially put down, creating the distressed look that I absolutely did not want. I vowed to remedy that with a third coat, and I’m sorry to say that I was only somewhat successful; thankfully, the unintentional distressing was only on one of the legs, and I arranged the stool so that you can’t see it unless you’re looking for it.
The third coat, which was either extremely necessary or not at all, went on easier than I’d anticipated, probably because at that point, I was less precious about the entire endeavor. I vowed to let the thing dry for at least four hours, if not more, and embarked upon my errands.
Making it shiny-ish
When I got home a few hours later, I used my judgment and decided that it was time to make it gleam. Once I ascertained that the stool was dry enough to finish, I took out the nicer, more expensive brush that I’d just purchased and got after it. I remain grateful that I’m not a perfectionist, because the first coat of polycrylic was a little bit bubbly, despite stirring the stuff before painting and taking my time. Patience will be your friend again in every step of this process; some parts of the stool were not as dry as others, and I only noticed this when I saw streaks of pink on the brush. However, this didn’t have much, if any, impact on the actual finish. I laid down the first coat as smoothly as I could and vowed to let it dry overnight.
The next morning, my patience was rewarded. The second and final coat of poly went on smoothly, and the bubbles, minimal. I let the stool hang out for admittedly less time than I should have, though my natural impatience didn’t ruin the end product. After a few hours, I determined that the stool was dry enough and put it in its final resting place.
Will I do this again?
Like everything in life, good or bad, this was a learning experience and an exercise in understanding the limits of my own patience. The end result is not quite what I’d imagined, but honestly, what in life ever is? The vision I had was something akin to this desk–glossy, glamorous, bespoke. The result is a little less so: from a distance, the thing looks great, but up close, you can see my little mistakes here and there. While I’m glad that I used the polycrylic instead of rubbing furniture wax into the thing for hours, a part of me wishes that I’d left the stool matte, because the color was more vibrant. Nothing about the finished product looks kitschy; the vibe skews a tiny bit artsy-fartsy, but my stool is no longer an eyesore! And now that I have enough paint to paint an entire suite of furniture, should I choose, I feel more confident in my skills. There’s very little danger of a late-in-life career change; at no point will I pivot to furniture flipper, but I feel confident enough to say that chalk paint can be chic, because "chic" is in the eye of the beholder.
Illustration by Sol Cotti
We love the products we feature and hope you do, too. If you buy something through a link on the site, we may earn an affiliate commission.
Related Reading:
Published
Last Updated
Get the Dwell Newsletter
Be the first to see our latest home tours, design news, and more.