The Making of Screenplay: Part 9
The main issue we needed to determine was how we would wrap the rope around the steel frame so that each loop would stay in the correct position along the length of the steel frame. The tendency is for the loop to slide along the steel frame since there is no friction to prevent it from doing otherwise. Our solution on the physical model was to "pre-wrap" each steel frame with rope, meaning we loop the rope around the entire length of the steel section. This is an extremely time-consuming process, so we were hoping to avoid it in the actual installation; however, after many tests, we realized that pre-wrapping was still the best solution because it was the cleanest way to create a gripping surface that matches the rope, and it also helps with the spacing of the ropes. Without the pre-wrap, we would have to add extra loops between each section of rope to space them out properly. We were certain that this way would create much more inconsistencies and is actually much more time consuming. Since every steel section is a different length, the number of "spacer" loops would be different in every section.

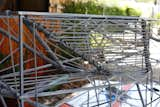
A close-up view of the pre-wrapped frame. Photo by Clifford Ho.

We determined the number of rope per section by subdividing the frame to see how it fits. Photo by Clifford Ho.
This brings us to the spacing issue. We needed to find the right number of ropes in one vertical bay that will fit in the shorter steel sections but still look "full" in the longer steel sections. We tried various numbers, from fifteen pieces up to twenty-five pieces of rope per section. At the end, we went with twenty-five pieces of rope because it gave us the most "planar" look at the longer lengths while still fitting into the shorter
One of the quick spacing tests, with twenty pieces of rope. Photo by Clifford Ho.

Another spacing test, trying to figure out the best spacing between the ropes. Photo by Clifford Ho.
While we are happy with how we have resolved the details (especially in the detail of how we ended the rope at the bottom of the bay), we are now very worried about the schedule. Based on our initial tests, it will take us at least two months just to finish the roping process…and we have three weeks!
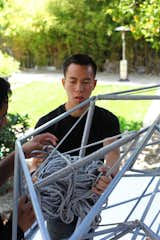
Managing large bundles of rope while looping has become one of the challenges of this process. Photo by Clifford Ho.

We terminate one piece of rope by wrapping the next piece of rope around the end of it. Only the very last rope in the sequence will then be crimped with hardware. This really helps us minimize the amount of hardware we had to use on the project. Photo by Clifford Ho.
Next week, we hope to get more volunteers, streamline the process, and hopefully get the schedule back on track!

Our staff is finishing the physical model. The physical model is now being used outside in the field to understand the paths of the rope in each section. Photo by Clifford Ho.
Published
Last Updated
Get the Dwell Newsletter
Be the first to see our latest home tours, design news, and more.