
Construction Diary: A Young Couple DIY a Lofted Yurt in Portland
Serene, chic, and decidedly modern, the yurt that Zach Both and Nicole Lopez now call home in Portland, Oregon, was completed over six months with a budget of about $63,000. Tour their newly completed sanctuary in the video below, then read on for Zach’s first-hand account of the journey—from scouting sites and yurt companies, to erecting the structure with friends, to making the interiors feel like home.
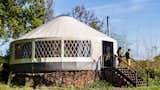
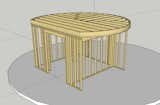
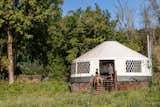
Zach Both and Nicole Lopez customized the interior of a 30-foot Eagle Yurt purchased from Rainier Outdoor.

"The view out the front doors is our television," says Zach. "You can see three different mountains—Mount Hood, St. Helens, and Adams—all from one viewpoint."
1. Exploring Alternatives
We needed a change. I found myself on another futile trip to Los Angeles pitching the cagey personalities of the entertainment industry while my girlfriend, Nicole, was toiling away at an increasingly unsatisfying desk job in a remote part of Las Vegas. Our ranch-style rental was small enough that a full tour of the living space could begin and end without moving from one spot in the house. The only greenery on the property was a lurid patch of artificial turf that reeked of dried dog urine—a housewarming gift from the previous tenants. Our complete lack of furniture would make it that much easier to pick up and leave when the opportunity presented itself in the form of a job offer for Nicole. It would be the only catalyst needed to move us from the barren desert to the idyllic city of Portland, Oregon.
The yurt, which measures about 730 square feet with an additional 200 square feet from the added loft, is truly capacious compared to Zach’s previous home, a converted camper van.
Dejected over rent prices in this quasi-utopia, we immediately began considering alternative dwellings that I was introduced to during my time traveling the country in a self-converted camper van.
Lloyd Kahn’s iconic Shelter book served as my first introduction to yurts. Among the pages describing indigenous building methods and vernacular architecture, you’ll find a smattering of paragraphs dedicated to the traditional tent-like structure often used by the nomadic tribes of Central Asia.
The Shelter book by Lloyd Kahn is filled with pages of alternative dwellings, including yurts.
If these round, wood-framed, and fabric-covered homes have withstood the test of time for millions of Mongolians over thousands of years, it would be more than suitable for the two of us. The yurt would become our construction laboratory—the humble hammer acting as our microscope, and a pair of overalls as our lab coat. Our successes and failures would be documented and later shared with others as a dissertation of sorts.
2. Securing Land
One massive hurdle stood in our way. We would need to find a place to build the circular structure, and it needed to be within a reasonable commute to downtown Portland. With our limited budget and timeline, we ultimately decided to lease land, putting the temporary nature of the yurt to the test.
Day one at the building site.
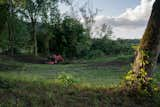
After a month of searching, we found a parcel of farmland advertised on Craigslist that boasted views of the three neighboring snow-capped mountains and a 25-minute drive to the nearest downtown ramen joint.
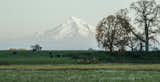
Mount Hood watches over the acres of farmland.
Concerns persisted. Yurts remain unfamiliar to many building officials and within a legal gray area in most counties in the U.S. However, the owner of the land ensured us there would be no problems. The laws stemming from agricultural zoning were flexible enough to provide some leeway. Not knowing much else, we signed on the dotted line and committed to a yearlong lease for $700 a month. Because of the scenic location and proximity to the city, we considered listing our future yurt on Hipcamp when we were out of town to offset the rent.
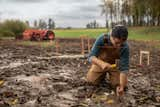
Zach marks the position of the yurt’s footings with spare rebar in the mud.
3. Choosing a Yurt Company
With winter quickly approaching, fabricating all the necessary materials needed for a yurt was out of the question. The American adaptation of the yurt was introduced in the ’70s, and its design has been refined to a degree that would be near impossible to replicate for a bumbling 25-year-old such as myself. A small cohort of yurt manufacturers now offer their own versions of a yurt kit with modern materials and structural engineering standards capable of withstanding extreme weather conditions and decades of use.

Rainier’s expansive factory manufactures over 100 yurts and canvas cottages a year.
After exploring the available options, we acquired our yurt from Rainier Outdoor. A tour of their facility revealed a massive operation that weaves handcrafted quality with state-of-the-art tech. Their kits come with a higher price tag justified by thicker lumber, custom metal hardware, and a completely round ring at the apex of the roof—the only company whose wooden ring forgoes a polygonal shape in favor of one that matches the circular yurt structure. A yurt package similar to ours would total $38,000 with additional options included.
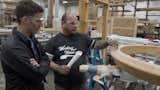
Chris Gogue, Rainier’s wood shop master, shows Zach how they make their unique glulam ring.
Every question I had was answered by Dana Hendel, the woman at the helm of Rainier’s yurts and the one you’ll find driving around Tukwila, Washington, with "YURTGRL" emblazoned on her license plate.

This is someone who really loves yurts.
4. Building the Platform
Since modern yurts are designed to sit on a platform, the integrity of the entire building relies on a solid base. At 30 feet in diameter, our yurt would be on the larger side and required an appropriate foundation to hold the additional weight. The pier-block construction you’ll find under many yurts would hardly satisfy most building inspectors and are better suited for smaller, much more temporary yurts. Instead we invested in 12 rebar-reinforced concrete footings built into the ground below the frost line.

Zach’s girlfriend, Nicole Lopez, and dad, Kent Both, bond over the mixing of concrete.
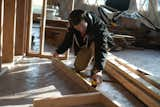
With help from my father over a period of a week, 127 80-pound bags of concrete were mixed on-site and poured by hand. Pressure-treated posts and beams made up the sub frame. The last step was to install the structurally insulated panels (SIPs) to complete our deck. Pre-cut to a circular shape, the massive panels clicked together like puzzle pieces supersized for King Kong or Paul Bunyan.

Some of the team seal the seams and finish the edge of the platform before building the yurt.
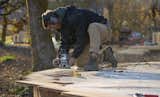
Zach’s first experience using a router to trim the yurt’s flooring down to size.
5. Yurt Build Weekend
Unlike the modern American house, a yurt can be erected in a weekend by a band of novices, most of whom can’t pick out a Phillips head screwdriver from a toolbox lineup. Our closest friends traveled across the country to participate in what we coined our "yurt birth," a hippie equivalent of a barn-raising party.

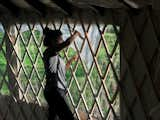
A chilly sunrise peeks through the lattice walls at the build site.
The earliest stage of any construction project is highly influenced by elements beyond a human’s control. High winds and rain can be detrimental to the success of building an exposed exterior structure in a timely and painless fashion. Fortunately, the only thing raining down was the occasional shower from migrating geese.

A former coworker and current friend of Zach’s, Ryan McDowell, flew out to Portland to help with the build.
Ryan was the tallest person on site and yet he was doing the lowest of jobs—aligning lattice.
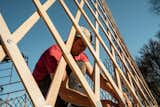
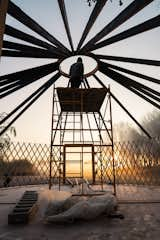
The lattice walls elicited an audible "Woaaah…" from the group as the crisscrossing wood unfolded in a motion resembling an accordion’s opening note. Three of us balanced on a small scaffolding platform 15 feet up in the air to install the first crucial roof rafters. Neighbors stopped in the road to gawk at the UFO-like shape.
The first four rafters are the most crucial.
Another day, another step forward in yurt building.
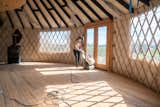
After three days of construction, our collaborative build came to a close as we attached the insulated vinyl membrane to the walls of the yurt. We spent that evening on a collage of air mattresses within the yurt’s empty interior. We talked and laughed late into the night as we looked up through the clear dome at the night sky above.

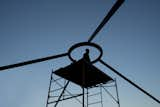
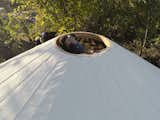
The dome is the most fragile part of the yurt. It takes special care to install.
One last kiss before sealing up the roof.
6. Building in the Round
Any DIY task can be intimidating on the first attempt. However, if the ability to shower, charge a phone, or cook a meal is reliant on your capability to build something, your willingness to jump in headfirst increases tenfold. A recently built yurt is just that: an empty space waiting for all the fixings that make a home habitable.
The framing features a unique triple cantilever loft designed by Matt Daby of Moda by Design.
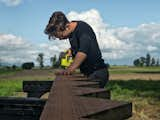
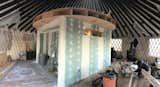
Thoughtful measuring and cutting is the most important part of framing walls.
Nicole and I stumbled through everything from running plumbing and electrical lines, to framing walls with sheetrock and resurfacing our salvaged wood flooring. It was our first time attempting any of it.
Nicole works the drum sander like a pro.
During a three-week visit, Zach’s little brother, Silas, helped build the front stairs. By the end of it all, he could cut stringers with his eyes closed.
Online videos and phone calls with experienced tradesmen proved to be an invaluable resource in getting started. We made lots of mistakes along the way, but once we reached the finish line, Nicole and I both felt that we had gained a new hidden super power.
It’s hard to imagine the final space coming together when you're so deep in construction.
7. Designing the Interior
Tell people you’re building a yurt, and they will immediately envision a rustic interior akin to a primitive log cabin. It was a perception ripe for subversion by designing a yurt with true contemporary styling.
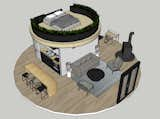
Zach used this 3D model designed in Sketchup to explore the layout and style of the interior.
The tedious task of painting every piece of lattice to match the fabric behind it.
Ebony stained rafters would provide stark contrast, drawing the eye to the strong geometric framing of the roof, while the painted lattice would subdue the diamond-shaped pattern that can at times be overpowering.
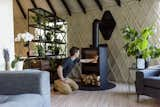
A Raise Q-Tee II wood-burning stove keeps the yurt cozy.

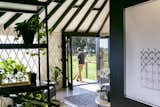
"It's really nice to have a little office space that I can call my own," says Zach. A vintage tanker desk abuts two Archive walnut bookcases from Article. A Modway Entangled Dining Arm Chair echoes the open lattice of the yurt.
A single interior room would house a bathroom while acting as a partition that divides the yurt into natural living quarters. It was important that this room stood alone near the center, detached from exterior walls, allowing visitors to discover more of the space as they walked around the perimeter.

The bathroom is housed within the central, interior room. A Villa 9215 compost toilet from Separett directs liquids to the garden, and solids to the compost.
!["We tried to pare down [in the kitchen]," says Zach, "so even our appliances are small and compact." A Summit FF923PL Refrigerator and IKEA cabinets outfit the efficient space.](https://images2.dwell.com/photos/6063391372700811264/6575851707250438144/original.jpg?auto=format&q=35&w=160)
"We tried to pare down [in the kitchen]," says Zach, "so even our appliances are small and compact." A Summit FF923PL Refrigerator and IKEA cabinets outfit the efficient space.
The loft bedroom was my opportunity to create something that had not been done before in a yurt. As a circular structure, it was only natural that the loft constructed out of birch plywood would adopt a similar round shape.

Plants adorn the edge of the lofted bedroom.

Tencel sheets and a wool comforter wrap a hybrid latex mattress, all from Nest Bedding. A circular skylight illuminates the bedroom area, emphasizing the garden vibe.
To incorporate a pop of color into our neutral interior palette, dozens of houseplants would be added along the edge of the loft, complementing the abundant greenery outside the yurt. The muted furniture and matte black touches of hardware and cabinetry would provide a minimalist polish to the finished space.
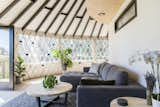
Article furniture fills the living area: the Soma Twilight Gray Right Sofa Bed pairs with a Vee Metal Gray Rug; and the Toba Natural Teak Coffee and Side Table continue the home’s neutral palette.
The cost of materials for the interior—from building supplies to furniture and appliances—would come out to just over $25,000, bringing the total value of our yurt to $63,000. While not a trivial amount of money, the greatest cost would actually be the time involved. For the better part of six months, constructing a yurt of this scale and caliber became a full-time job with overtime. Travel plans were postponed. Socializing became a rare occurrence. Any sense of normalcy fell by the wayside. Nicole and I worked tirelessly towards the moment when we could step back and marvel at what we had built together.
8. Creating Do It Yurtself
Once the paint dried and the sawdust cleared, we moved in and have enjoyed the revolving door of friends and family experiencing the space we created.
The yurt stays connected to the outdoors through large windows and a small back door and pathway.
But the work was far from over. It was our turn to pass on the lessons we learned by creating DoItYurtself.com. The website and corresponding video series is our contribution to the free, accessible web—a friendly adviser and helping hand for those seeking the motivation to tackle their next big project.

DoItYurtself.com is a free online guide about building yurts.
What should we build next?
More Construction Diaries:
A Serene Desert Hideaway Is Part Rental, Part Designer Showcase
Published
Last Updated
Get the Dwell Newsletter
Be the first to see our latest home tours, design news, and more.