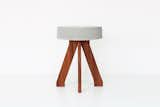
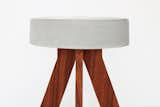
Dwell Made Presents: DIY Concrete Stool
In this episode of Dwell Made, Jessie Uyeda of HomeMade Modern makes an upgraded version of the classic bucket stool. This sturdy concrete stool works well as seating or makes a stylish, modern side table or plant stand. This easy, DIY concrete project requires only a few basic tools.
Key Products
Tropical Hardwood or Mahagony: We used a 11.25" wide by .75" thick mahogany board, but any tropical hardwood about .75" thick would work well. Ipe deckboards would be a great option.
Step 1: Lay Out the Design
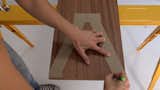
I drew a template for the legs on a piece of cardboard and then used a ruler and knife to cut it out.
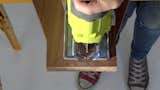
Step 2: Trace Onto Wood and Cut With Jigsaw

I traced the lines onto a piece of mahogany and then used my jigsaw to cut out the pieces. I used a drill to create holes at some of the corners.
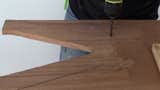
I used the same template to cut two sets of legs.
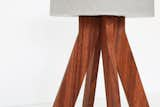
Step 3: Notch the Legs
I wanted the legs to fit together, so I notched each set of legs.
Step 4: Sand the Legs
I used my orbital sander to sand the legs.
Step 5. Attach L-Brackets
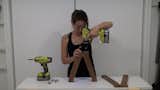
I attached some L-brackets to the legs. I pre-drilled the holes so that the legs wouldn’t split.
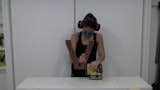
Step 6: Mix the Concrete

I mixed 2.5 inches of Quikrete 5000 in the bottom of a five-gallon bucket. I added water until the concrete had the consistency of oatmeal.
Step 7: Vibrate or Tap the Bucket

I vibrated and tapped the bucket to get out some of the air bubbles.
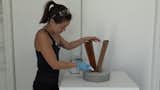
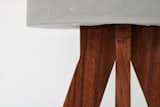
Step 8: Place the Legs

I placed the legs with the ends just going into the concrete by about ¾" of an inch.
Step 9: Let the Concrete Cure, Then Remove

After letting the concrete cure for at least 48 hours, I flexed the top of the bucket in multiple directions and then pulled out the stool.
Step 10: Apply Danish Oil
I finished the legs with a coat of Danish oil.
Published
Last Updated
Topics
DIYGet the Dwell Newsletter
Be the first to see our latest home tours, design news, and more.