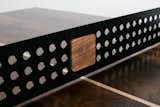
Woolsey Ping Pong Table
3
of
18
Woolsey Ping Pong Table
Save