Dwell Home Venice: Part 19
For the countertops and backsplashes in the bathrooms and kitchen of Dwell Home Venice we selected Caesarstone in Organic White 4600 with a polished finish.

Caesarstone is comprised of natural quartz aggregates combined with pigments and polymer resins. After the raw materials are blended together, they are poured into a mold which forms a slab that is 120x57 inches. The slab is compacted by a vacuum and vibration process at a pressure of 100 tons and then cured in a kiln which is heated to 194ºF for 45 minutes. The final stage is polishing which delivers a remarkably strong, durable and beautiful product.
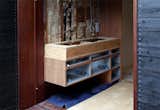
The vanity in the master bathroom is ready for the Caesarstone to be installed. The top portion of the vanity is a plywood sub counter which the Caesarstone will rest on.
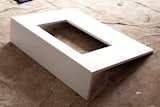
This bathroom countertop and front apron have been fabricated off-site. This will be installed as a single piece, with the backsplash added separately.

For each countertop, the opening for the sink was cut at the fabricator’s workshop. In this image one of the openings is fine-tuned on-site.
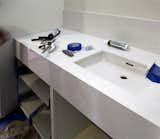
A freshly installed Caesarstone countertop with backsplash and front apron in a guest bathroom.
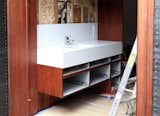
The master bathroom vanity with the Caesarstone apron, counter and backsplash installed.

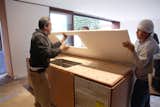
Mounting one half of the kitchen backsplash. The opening in the foreground countertop is for the gas cooktop.
Lifting the Caesarstone countertop onto the kitchen island. A template provided by the sink manufacturer was used to cut the opening for the sink at the correct size and location.

The kitchen island countertop is settled into place. We will drill holes for the faucet and food disposal switch after the adhesive has hardened.

Guy Katz from Caesarstone came to check on the installation and to clean up a small mark on a counter which developed during fabrication. Guy has an array of special restoration and cleaning products, and also expert knowledge of Caesarstone’s material properties.
Published
Last Updated
Get the Dwell Newsletter
Be the first to see our latest home tours, design news, and more.