How to Replace Your Kitchen Cabinets
At a Glance
Experience
- This probably isn't your first rodeo in the DIY space.
- Even so, you may want to consult a professional builder.
Budget
- You can splurge on bespoke cabinets, or choose more affordable or salvaged options.
Time
- The key here is not to rush.
If there’s one kitchen component that’s bound to get used every day, it’s cabinetry—and over time, those hard-working cases will begin to show their age.
"A good indicator that new kitchen cabinets are necessary is when your paint starts peeling or chipping," says Alexandra Gater, home decor YouTuber. "Furthermore, old cabinet doors can start to warp or fail to close properly because of water damage or rusted-out hardware. Once those things are beyond repair, it’s time for a replacement."
Replacing cabinetry comes with a slew of variables and is best suited for an experienced DIYer (who isn’t afraid to ask for professional help). Then there’s the budget consideration: The average cost for cabinetry starts at $2,000 and can climb significantly higher depending on factors like paint and hardware, demolition and repair bills, changes in layout that impact electrical and plumbing, geographic location, and extended timelines. But if you’re up to the task, here’s how to get the job done.
1. Determine What Needs to Be Replaced
It’s possible that some of your existing cabinets are salvageable. "If they can be sanded down and repainted, it’s likely you can work with them to save some money," Gater says. Take note of the ones that show promise—really, place a note on them—and make plans for the ones that are a no-go. "Fun fact: You can actually donate cabinets to your local thrift store. It’s a great way to avoid a landfill."
In most instances, however, you’ll want to start completely fresh. "If you want a uniform look, then you should replace everything," says interior designer Ginny Macdonald. "However, if there is charm to the existing cabinets that aren't irreparable, then you could install new ones that complement the old ones." To do this, you could stick to a similar style or palette and use the same hardware throughout. Either way, ensure that the new cabinets are separate from the old ones—otherwise, you’ll need a very skilled carpenter.
2. Plan Your Layout
Sometimes a kitchen functions just fine, and other times, it’s like trying to waltz in a cave. This may be an opportunity to improve the room’s overall utility. "Think about what your issues are, and use that as a starting point," says Julia Marcum, co-founder of DIY blog Chris Loves Julia. "What size range do you need for cooking? Where does that fit on the wall? Is there an opportunity for more natural light?" You may want to install a new window or open things up to create a more social space.
Macdonald says that the classic "triangle configuration" of placing the sink, cooktop, and fridge no more than nine feet apart is still a good rule of thumb. "One main consideration during this process is whether to do panel-ready appliances so that they look integrated into the cabinetry for a nice, seamless look," she says.
Lastly, consider if you’d like to have open shelving, deeper drawers, and room for an island or peninsula. "Drawers are so incredibly functional and easy to design around," says Marcum. "As for the debate over open shelving, my advice is to add a single shelf under an upper cabinet for quick-reach items like mugs, salt and pepper, dinner plates, and even cutting boards."
3. Choose Your Cabinets

Whether to choose full overlay, partial overlay, or inset cabinets will depend largely on your budget.
Your budget will play a major role here, but the three main types of cabinets from least expensive to most expensive are partial overlay, full overlay, and inset. The latter two are the most popular choices at the moment, with full overlay doors completely covering the cabinet frame and inset showing the frame. Inset cabinets require more precision, since the spacing between the cabinet boxes is visible. Aside from cost, the overall style of your home will guide the decision.
Home renovation blogger Ashley Goldman, who lives in a century-old bungalow in San Diego, sought materials that complemented its character. "I live in a historic home in a desirable neighborhood, so solid-wood cabinetry was right for our home and for resale," she shares. "From there, I decided that classic, inset-style cabinetry was important to include, since it’s of the era, and then I researched pricing and built the rest of the kitchen renovation around the cabinetry cost."
With a style and rough estimate in mind, choose where you’ll source your cabinetry. There are numerous direct-to-consumer brands that sell all of the components, depending on what you need: boxes, doors, and drawers. Macdonald recommends budget-friendly options that use IKEA cabinet boxes with custom fronts, like Reform and Superfront, whereas brands like Plain English and Devol offer more bespoke varieties.
"Luckily, cabinetry is something that is generally ordered all at once, so there aren't many surprise costs," Goldman notes. "I spent my energy staying on top of all of the other expenses, and did have a contingency for surprises found in demolition, labor, and finishes."
Another environmentally friendly choice is to hunt for salvaged cabinets. "You'd be surprised to see how many high-end kitchens are torn out of nice houses and sold at shops Like Habitat for Humanity ReStore," Goldman says.
4. Prep for Demolition
Before tearing anything out, Meghan Chio, cabinets merchant at The Home Depot, recommends renting a Dumpster ahead of time, "given the size and number of materials the gutting process leaves behind."
Once you have a spot for debris, box up and store your kitchen items, and turn off the power, water, and gas. Chio advises renting dollies and moving carts to pull appliances out next. After that’s done, remove the doors and drawers. Finally, protect the work area: "Heavy plastic sheeting is a great way to help contain any mess," she says.
No matter how experienced you are with DIY projects, Chio strongly suggests that a professional takes a look at your kitchen prior to any dust flying. "Consulting a licensed builder or general contractor beforehand is essential for making sure everything goes smoothly," she says. The pro will be able to confirm load-bearing walls, unveil potential electrical and water issues, and discuss any important details related to the scope of your plan.
5. Paint Your Cabinets (If You Want)
Color swatches can help you choose the right shade of paint for your cabinets if you’re planning to add a coat. "Little sample pots can always help," Marcum says. "Take home a few colors, try them on different cabinets, and then observe them at different times of day with different types of light." Be sure to also account for the finish by consulting with a professional at the paint store about the best kinds for your exact needs, including how the color will complement the countertops.
It’s easiest to paint your cabinets before they’re installed. Slavik Garanovsky, general contractor at construction company Grada Inc., advises that you treat the frames separately from the drawers and doors. Label each piece before taking them outside. Sand the wood to prepare the surface with 120- to 150-grit sandpaper, depending on the material’s condition. Garanovsky recommends fast-drying primer, sanding between coats, and adding two coats to the surface. "Use a light to find any dents, and be sure to fill them in," he says.
6. Come Up With a Blueprint
At this point, you’re probably itching to get at those old cabinets. Gary McCoy, a Lowe’s store manager, has one last trick for keeping the work on track. "Make a basic blueprint and measure the walls, doors, and windows to the outside of the molding, including the floor to the windows, the bottom to the top of the windows, and the top of the windows to the ceiling," he says. "Also note plumbing, gas, and electric lines on your drawing as you go." Having a blueprint as a reference will help you keep track of cabinetry placement.
7. Remove the Old Doors and Drawers
According to Garanovsky, start by disconnecting the electrical panel, removing all lights and appliances, and then shutting off the water supply. Remove all moldings, using a knife to cut the caulking, which will save on drywall repairs. Unscrew the doors from their hinges and remove the drawers, labelling anything you plan to donate.
8. Rip Out the Old Cabinets

Lay down some heavy plastic sheeting, unscrew those old cabinets, and pry them off the wall.
Next, use a screwdriver to unscrew one cabinet from another, and—with a partner bracing the cabinet—remove it completely from the wall. Use a pry bar if the cabinets are connected by nails and staples. After, demo the countertops and backsplash using the help of a pro if it’s made of stone or concrete, and then repeat these steps for the bottom cabinets. It may be possible to salvage the countertops and backsplash if you plan on reusing or donating them, so proceed with caution. You might also need to replace some flooring if it has any damage.
As you take the cabinets down, it’s likely that some issues will arise, especially in regard to electrical wires (particularly in older homes). If that’s the case, stop where you are—the same goes for water damage, cracks in the foundation, and unearthing questionable materials. Drywall damage is also common, but doesn’t necessarily need a pro. Remove all of the cabinets and address the drywall before installing new ones.
9. Install the Lower Cabinets
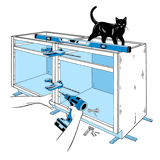
Starting at the highest point on the floor, begin installing the cabinets, using a level and shims to keep things even.
If you’re installing the new cabinets on your own, practice patience—it’s tough work, even for the most experienced. Grab your six-foot level and find the highest point of elevation on your floor that sits within your designated layout. Garanovsky says to begin the installation process at this point for a flush layout, starting with the bottom cabinets. "It's easier to shim under the cabinets on the lower spots to make them level, rather than starting on a low point and having to trim the bottoms of the cabinets while working uphill," he says.
Use shims to level each cabinet vertically and horizontally, and then hold the cabinets together with clamps. Screw in the cabinet at the front, near the door hinge, and then at the top, middle, and bottom of the box. Work behind the hinges for a cleaner finish. Then—with the help of a stud finder—nail the cabinets to the studs in the wall. "An uneven floor can wreak havoc on the project, so make sure that you check that each component is level, front-to-back and side-by-side, after installing each cabinet to maintain an even surface," says McCoy.
10. Install the Upper Cabinets
Repeat the process for the top cabinets.
"Spacing is key," McCoy says. "Start from the center point of the design and work your way out by dry-laying the cabinets on the floor." After the cabinets are installed, it’s time to nail in new moldings. Caulk the gaps, cover the nail holes, and paint the moldings for a clean finish.
11. Install the Cabinet Hardware

Think of the cabinet hardware as your kitchen’s jewelry.
Cabinet hardware is the final touch, and if you’ve been careful about costs this whole time, then it’s worth it to spend a little extra here. "Cabinet hardware should be the one thing you splurge on," says Gater. "Think of cabinet pulls and knobs as the jewelry that will pull together your whole kitchen."
Generally, knobs work well for upper cabinets while pulls are best for lower ones, and the best options will develop a patina over time. When you have the hardware picked out, install it with this trick from Gater: "Use painter’s tape on all your cabinets so you can visualize where you’d like the hardware to go and get a feel for what the hardware is going to look like."
You may want to use a professional template to ensure that the knobs and pulls line up perfectly. "They’re usually under $20, and will save you a ton of stress because filling holes in cabinets if you don’t get your positioning exactly right is going to cost you lots of money to fix," says Gater. Use a pencil to mark the placement of the hole using your template, and then drill the hole using a 3/16-inch bit. Repeat the process for each cabinet, and then screw in your hardware by hand.

When you’ve attached the last knob, take a step back to admire your handiwork.
Published