
The Complete Home Theater Setup Guide for Movie Buffs
Watching the latest blockbusters is perhaps the best way to spend a weekend for a movie buff. After all, who doesn’t like to watch movies in a theater on a large screen with surround sound?
However, this ultimate cinematic experience comes with certain disadvantages. To begin with, navigating through the weekend chores to rush to your favorite theater is easier said than done. Plus, you may have to watch the movie in uncomfortable seats. Sounds taxing, right?
Fortunately, your movie-watching experience no longer requires an arduous trip to the theater. Thanks to high-tech systems, you can bring the theater to your home. With a high-quality audiovisual system and home-theater-style seating, you can enjoy all the perks of a movie theater minus the large crowds and the uncomfortable seats. Whether it is a spare bedroom or a garage, with the help of the right audiovisual equipment and best home theater seating, any area can be turned into a remarkable media room.
Basics of Home Theater Setup
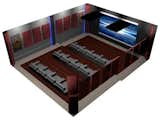
Display screen, projector, sound system, and home theater seating are the four basics that you need to have in place when designing your media room. Getting these four elements right is crucial for an immersing movie experience, regardless of the area of the house you are transforming into a home theater.
Display Screen Location
The huge display screen is the crown-jewel of your home theater system. The size of the screen is as important as the efficacy of the projector for a cinematic experience. However, choosing too big a screen will force you to swing your head from side to side in order to take in all the action. You need to buy a screen that fits the size of your room and home theater seating arrangement. It can be mounted on the wall or ceiling, or even placed on the floor, depending on your requirements. Here are a few tips for choosing the right screen for your media room.
- The screen height should be roughly one-third of the distance from the display to the seats in the media room. Place it 24" to 36" inches above the floor as the optimum vertical viewing angle is in the range of 15 to 20 degrees.
- Make sure to mount the screen on the wall that does not receive direct light.
- The gain or the reflective property of a display screen is also an important factor that can significantly affect your viewing experience. Avoid buying a high-gain model as it can result in hotspots of bright light in the center of the screen when viewing from the sides.
- Manual pull-down screens are ideal for low-budget and entry-level home theaters. You can easily hang these on the wall. Being retractable, they also save space.
- Fixed screens can maintain a relatively tighter surface tension leading to a smooth and clear image. However, they can be slightly expensive.
- Alternatively, you can paint a drywall with matte white paint to transform it into a fixed-frame screen. In fact, you can get good image quality on a matte paint wall-screen for a lot less money.
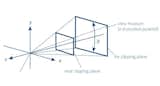
Projector Location
Determining the right spot for installing the projector can be tricky. A projector needs a proper throw distance, which is the distance between the projector and the screen. This can vary depending on the manufacturer and the model of your projector. You can use this projection calculator to determine the location for your projector.
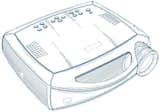
The projector installation manual usually consists of detailed instructions, including the throw distance. Fortunately, most modern projectors come with an adjustable optical zoom, which makes it easier to adjust the image quality. Here are few tips on determining the projector location for your home theater.
- Place the projector in the center of the room for the best image quality. However, make sure there are no objects in its path as the projector light needs a clear line to reach the screen.
- Projectors tend to build up heat. Make sure yours is mounted in a properly ventilated area to avoid heat buildup. Overheating often reduce the life of a projector bulb.
- The best place to mount a projector is the ceiling or a wall. In either case, it will get adequate ventilation on all sides. It will also have a clear line of projection.
- If you are going to mount the projector on a small coffee table, make sure to place it in front of the first row of seats in the media room for a clear line of projection.
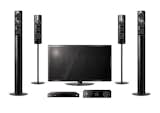
Sound System Arrangement
A high-definition sound system can create an amazing audio experience. However, you need to take into consideration the noise control regulations laid down by your local government before wiring the sound system. A typical home theater consists of a 5.1 surround sound system. You can opt for a more sophisticated system such as a 7.1 surround sound if the local regulations permit. Here are a few things that you need to keep in mind when arranging the speakers.
- If you are using a 5.1 surround sound system, place the three speakers and the woofer towards the front of the room. The remaining two speakers should be placed slightly behind your home theater seating.
- If you are using a 7.1 system, the 6th and 7th speakers should be placed right behind the audience. The rest of the arrangement remains the same as that of a 5.1 system.
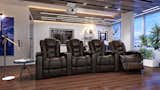
Seating Arrangement
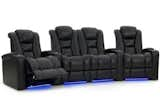
Proper home theater seating is essential for an enjoyable movie-watching experience. The first thing to consider is the number of people you want to fit in your movie room. The size, shape, and color of the seats in a media room can vary depending on your audience. In fact, you may have to add custom seats for home theater. For example, if you have kids, you may need small seats in the media room with colorful seat covers.
Most custom-made seats for home theater come with different seat accessories such as cup holders, swivel trays, power controls, and inbuilt USB chargers. These accessories also play a critical role in taking your cinematic experience to the next level.
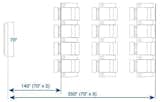
- The screen size is going to be a major factor in deciding the seating arrangement in your home theater.
- Here is a simple method to determine the minimum and maximum distance between the screen and seats for home theater. Take the horizontal length of your screen and multiply it by 2 for minimum viewing distance and by 5 to know the maximum viewing distance.
- Keep a distance of at least four feet between the viewer’s head and side walls as well as the back wall. Same distance should be maintained between viewer and surround speakers.
Choose the Right Location
Though it is possible to convert any area of your house into a home theater, it can depend largely on your requirements and budget. Typically, the garage, backyard, spare bedroom or the living room are the most suitable areas for setting up a home theater. However, creating a media room requires a considerable investment of money as well as time. So, it is important to understand the different benefits and challenges involved in transforming each of these areas into a fabulous media room.
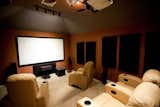
Basement

Challenges
Turning your basement into a movie room comes with several challenges. So, you may have to do the following:
- Contact the local government for the various codes, suggestions, and authorizations before going ahead with the renovation.
- More often than not, people use their basement as extra storage space. Move out the stored items to a separate storage facility in your house. You may have to rent a storage space, if necessary.
- The chances are, your basement was not constructed to house anything, but storage. As a result, many basements are unfinished. So, the next biggest challenge is to make it livable and soundproof.
- You may have to consult a contractor to ensure that your current central heating system can handle the stress of heating your garage as well. If it can’t support the additional infrastructure, upgrade to a system that meets your heating requirements.
- You may also need to speak with an electrician to ensure that your existing wiring can support the heavy audiovisual equipment.
Solutions
You can start remodeling your basement once you get all the necessary permits from your local government officials and building authorities. The first thing you need to do is decide how much work are you going to do yourself? Depending on your skill level, you may have to outsource a few tasks such as electrical wiring or plumbing of the basement. If you decide to do it yourself, however, you will need to create an action plan, not to mention a layout design, before starting the work. The benefit of the basement is that generally, all 4 walls are up and one only needs to lay down flooring and do paint work to get the room functional, in most cases.
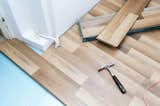
Flooring
- You need to protect the concrete floor from dampness and mold as you are going to spend a lot of time in the media room. You can purchase wooden flooring from a nearby hardware store and nail it into the concrete floor.
- You can also cover the floor with a carpet for additional protection from cold and dampness.
Insulation and Vapor Barriers
- Use a layer of vapor barrier to cover the exterior of the walls and the ceiling to ensure protection from outside moisture. Make sure to cover the joists and studs properly to ensure maximum insulation.
- The interior ceiling and walls need to be covered with thermal and acoustical fiberglass insulation. You can also insert bits of fiberglass insulation into the joist gaps for enhanced sound and temperature control.
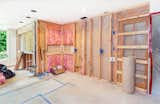
- Use acoustic drywall panels as the final layer of insulation on the interior walls and the ceiling of the basement. A double layer of such drywall not only provides superior sound damping, but also protects from mold, mildew, and moisture.
- If you are going to use concealed wiring, make sure to pre-wire the entire electrical layout before installing vapor barriers and fiberglass insulation.
- Use caulking or foam sealant to close gaps around windows, doors, wiring, and plumbing, among others.
Painting
- Finally, paint the ceiling and walls with your favorite color. Though you can use any color, it is better to use dark and non-reflective colors for an enhanced cinematic experience.
Display Screen
- Choose the type of screen that meets your requirements and fits in your garage. You can, however, use a fixed-screen for better viewing experience. As you are likely to not use the room for other purposes, installing a fixed-screen can be the best way forward.
Projector
- The projector is usually placed on the wall, right behind the home theater seating area or mounted on the ceiling just above the viewer’s head.
- As the basement is going to be a dedicated media room with controlled lighting and no ambient light, you can use an LCD projector having 1000 ANSI lumens (brightness) or more. They are also best for small and mini screens.
Sound System
- Most people prefer in-wall or ceiling-mounted speakers for dedicated home theaters such as a basement. The in-wall arrangement is the best way to go, especially if you have installed acoustic wall panels and ceiling in the room.
Seating Arrangement
- The quality and layout of the seats for media room can affect the level of your cinematic experience. After all, who wants to settle for folding chairs and coffee tables after spending so much money and time on renovating the garage? Choosing the right seats for home theater is essential as it can be an expensive investment. Make sure the arrangement suits your purpose. For example, three to five high quality leather cinema loungers are your best bet if you are going to entertain friends frequently.
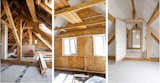
Attic
Even the smallest spare attic can be a great location for a home theater. If you have more than one room available, choose the one with minimal windows and doors. The room should be rectangular in shape, self-contained, and quiet. When in use, it shouldn’t interfere with rest of the household as loud music and movies can disturb others in the house.
Challenges
Turning your attic space into a movie room comes with several challenges. So, you may have to do the following:
- You may need to create extra storage space in the garage or someplace else as the spare room will be cleared of items such as dressers, shelves, beds, chairs, and cupboards. The electronic equipment and the seats in a media room will occupy most of the space. So, make sure to remove as many items as possible.
- More often than not, people use their garage as extra storage space. Move out the stored items to a separate storage facility in your house. You may have to rent a storage space, if necessary.
- Wiring is a major concern because you will need custom wiring for electronics and lighting in the room. Due to the limited space, laying down concealed wiring can be a challenge.
- Choosing the right seats for a home theater can be a challenge too because of the limited seating area.
- Installing the right type of home theater equipment, including a display screen and a projector can be tricky especially if the room is too small. This applies to home theater seating as well.
- Getting furniture and certain other large items into the attic via narrow staircases could be a potential issue.
Solutions
Make sure everything is working properly including the wiring, plumbing, and central heating in your desired media room before starting the remodeling. Plan the entire installation process well in advance to avoid delays.
Pre-Wiring and Ventilation
- Check the existing electrical system for its ability to support customized wiring requirements for a home theater setup. You may need to install a surge protector or a protection box for the equipment.
- You need to hide the wiring wherever possible. A tangled mess of wiring can be a potential safety hazard for children as well as adults, apart from running the aesthetics of the home theater. Make sure to conceal the wiring in the drywall or protective tubing.
- The wiring should be installed along the baseboards if possible as running cables under the carpet or the aisle may lead to an accident.
- You may need to install a ceiling-mounted ventilator to prevent overheating of the electronic equipment, especially the projector.
Display Screen
- Place the display screen on the largest wall in the room right across the seats in the media room. Avoid mounting it on a wall right across a window, though.
- You can also place the screen inside a closet if it is big enough to accommodate it. Alternatively, you can install a pull-down screen on the wall to save space.
- The cheapest option is to paint a wall with white matte paint and use it as a display screen.
Projector
- As there is no ambient light in most attic home theaters, unless one has skylights, but if not you can use a projector with 1000 to 2000 lumens for high-quality image.
- The best place to install a projector is the ceiling as it allows you more space for arranging seats in a media room. It also reduces the chances of blocking the view.
- You can use a short throw or ultra-short throw projector for a small media room. It can also prevent shadows from obstructing the projected image. Such a projector has a very short throw ratio.
- Hence it can be accommodated in such a room.However, most short throw projectors have fixed lens, no zoom, and usually a fixed offset. The bottom-line is, it has extremely limited flexibility.
Sound System
- Installing acoustic sound panels on each wall is a must for a state-of-the-art sound system. These panels can enhance your listening experience as well as reduce the disturbance caused by the noise coming from your media room.
- If it is possible to conceal the wiring, you can use wired surround sound. However, for smaller rooms, wireless surround sound is perhaps the only best option.
- You can use a 5.1 or 7.1 surround sound system depending on the size of your room. For smaller rooms, however, a 2.1 surround sound system concealed in the wall or ceiling should suffice.
Seating Arrangement
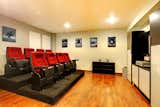
- When it comes to choosing the type of seats for a media room, the size and layout of the room is going to be a major concern.
- Though placing a comfortable sofa against the back wall solves the problem, customized space-saving seats can add a touch of elegance to the room.
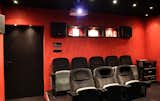
- For a wider room, use narrow recliners or traditional cinema rockers, as shown in the image above. These chairs save a lot of space when compared to the fully reclining loungers.
- If possible, you can also create levels to accommodate two or more seating rows in the room.
- People often use stadium seats for media room to save space and add more rows in a relatively small space.
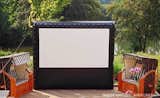
Backyard

Watching a movie outside in your backyard can be a lot more exciting than watching one indoors. But, turning your backyard into a home theater is certainly more challenging than setting up a media room inside the house. Turning your backyard into a home theater, however, allows you to host a movie night for a significant number of guests. It provides the ideal setting for a small office or birthday parties.
Challenges
Turning your backyard into a outdoor cinema comes with several challenges. So, you may have to do the following:
- The biggest hurdles that stand between you and an exceptional movie experience are the noise restrictions and safety regulations in your city. You need to check with the local authorities before setting up a home theater in your backyard.
- Safety regulations aside, you also need to observe a few social norms. Your movie night can be potentially disruptive to your neighbors, especially if you are planning a late-night viewing.
- You also need to ensure that you have a safe and reliable power source. Using a power cord extension may be the best way to go for temporary installation. On the other hand, if your backyard is going to be a regular movie-watching spot, you may need a more permanent power set up with proper insulation.
- The sound system is also one of the most critical elements of an outdoor home theater setup. Your audience will lose their interest immediately if the sound is weak.
- Your system needs to overcome several noise barriers, such as traffic noise, to create a pleasant acoustic experience.
- You will also need to make sure those mosquitoes, bugs, and moths don’t spoil your evening.
Solutions
Nothing beats the excitement of watching your favorite flick right in your backyard, especially in the summer. Here is what you need to do to make it happen.
Display Screen
- On the cheapest side of the things, you can use a clean and wrinkle-free white bed sheet tautly taped or sewn into a wooden frame as a screen. On the other hand, you can use modestly-priced retractable and weatherproof display screens for a better viewing experience.
- Alternatively, you can also use a large inflatable screen. An inflatable screen can be folded in minutes and stored in your garage. It is waterproof, fire resistant, and durable. All in all, it is money well-spent.
Projector
- You are probably going to need an LCD or DLP projector with high-lumen output to ward off the effect of ambient light coming from traffic and street light. You need to use a projector with at least 2,000 lumens.
- Electronic keystone is also an important feature. It allows you to adjust the image to fit the projection angle. This feature comes in handy, especially if you are placing the projector on a temporary setup such as a coffee table or a card table.
- Aspect ratio and resolution may not be as critical as other components. In an outdoor home theater setting, a bright and crisp image is more important than a higher resolution.
Sound System
- In the case of a temporary arrangement, you can simply bring your indoor speakers out for the night. A 2.0 system is usually recommended for this type of setup as it requires minimum wiring. You can place one speaker on the right and the other on the left side of the screen facing the seats.
- All-weather outdoor speakers are your best option if you are looking for a permanent setup. These speakers can be easily pre-wired throughout your backyard. They can be concealed in your backyard landscaping or mounted on existing structures such as walls. They are capable of projecting the sound over a large area.

Seating Arrangement
- Blankets for kids and lawn chairs for adults is the most common seating arrangement for an outdoor home theater setup.
- Though you can’t roll out plush sofas or chairs for a movie night, tons of seating options are available. Beach-yard theater seats are one of the brilliant DIY ideas to create comfortable and stylish seats for the home theater in your backyard.
- You can also use your outdoor chairs or even a cozy loveseat for the evening.

Debug the Space
- Use citronella candles or torches to remove insects, bugs, and mosquitoes from your backyard. You may also need to keep a bug spray handy, just in case.

Livingroom
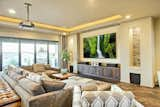
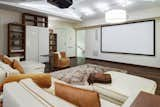
The living room can be a great location for a home theater, especially if you tend to invite people over for a movie night. Usually, being the largest room in your house, it can easily accommodate a large group. With the help of integrated home theater features, your living room can become the perfect spot for an elevated cinematic experience.
Challenges
Though your living room can be a great location for a home theater, turning it into one is a challenge. Unlike the other areas of your house, it is not possible to turn your living room into a dedicated media room.
- The biggest challenge is the incorporation of all the home theater media components without compromising the existing style and decor of your living room.
- The seating arrangement needs to be flexible to meet the requirements of both, a living room and a movie theater.
- Controlling the ambient light can be a big problem too as most living rooms have large windows.
- As you can’t remove the existing furniture, designing the sound without compromising the acoustic harmony is a tough nut to crack.
Solutions
With proper planning and the right equipment, your living room can function as a home theater as well. Just make sure to take into consideration the different styles and requirements of both, a living room and a media room before making the changes.
Lighting
- Use dark-colored curtains to block ambient light coming through the windows.
- A dimmer switch can be used to control the lighting in your living room. Conceal the lighting in the ceiling or the walls.
- You can also paint the room in dark hues such as a burgundy or navy blue to enhance the viewing effect.
Display Screen
- Use motorized ceiling-mounted screen that can be pulled down with a remote. Retractable screens can also make the transition from a living room into a media room smooth and nifty.
- If you are using a fixed screen, make sure to mount it on a wall instead of placing it on a cabinet or an entertainment unit. Wall-mounted screens can add an aesthetic look to your living room.
- Alternatively, you can hide the screen behind a remote controlled shelf or a cabinet.
Projector
- Concealing the projector is essential from the aesthetic point view. Book cabinets, tabletops, and the ceiling are the common places to hide one. You may need to use a motorized lift to retrieve the hidden projector from the ceiling or a tabletop.
Sound System
- As a living room is usually larger, you can use the 7.1 or the 5.1 surround sound system for an authentic movie watching experience.
- In the case of limited space or budget constraint, you can install a couple of speakers right behind the viewers’ seats in the media room for a balanced sound.
- If your budget permits, use wireless speakers to avoid cluttered wiring. However, you can also pre-wire the sound as well as lighting system into the dry walls and ceiling.
- Conceal the speakers in a bookshelf or a cabinet box to hide them from plain view when the sound system is not in use.
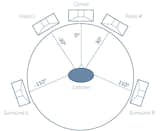
Here is a diagram that explains the arrangement of speakers for 5.1 systems.
Seating Arrangement
- When it comes to integrating a home theater in a living room, consider buying furniture that can transition from living room furnishing to comfortable seats in a media room.
- The sofa or couch to be used as the home theater seating should face the screen from an optimal viewing distance.
- More often than not, a living room can benefit from a flexible home theater seating arrangement. You can opt for stadium chairs, loveseats, or recliners that can be moved out of the living room when not in use.

Conclusion
A home theater can be the perfect place to hang out with friends and family members to have some fun. Thanks to affordable home theater technology, you can convert a spare room in your house into a state-of-the-art media room without spending a fortune. However, setting up a home theater is no easy task. It requires careful planning and the process can be highly demanding. Fortunately, with the right planning tips and useful ideas, you can complete the process without a hitch. Hopefully, the above tips and ideas will help you achieve the desired results.
This post was originally published on Octane Seating blog
Published
Get the Dwell Newsletter
Be the first to see our latest home tours, design news, and more.