Dwell Made Presents: DIY Walnut Side Table
In this episode of Dwell Made, Ben Uyeda of HomeMade Modern takes a rough slice of a walnut log and uses a palm router to flatten and level this slab into a table top. This videos shows an easy way to make a router sled with spacers to flatten even the roughest pieces of lumber.
Key Products:
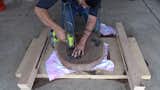
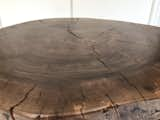
Step 1: Inspect and Fix the Slab
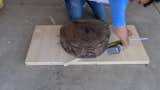
This slice of a walnut log was salvaged from walnut tree that had to be cut down. I checked to make sure there were no nails or pieces of gravel stuck to the wood that could chip the blade in the router. I used shims and a hot glue gun to get the slab roughly level and to glue it down to a plywood platform that I made from scrap.
Step 2: Rip Strips of Plywood
I ripped strips of ¼" Masonite and ¾" thick plywood on my table saw. These strips will act as spacers for the router sled I am going to build.
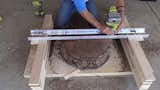
Step 3: Build the Walls
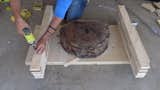
I screwed these strips down to the plywood platform to build up wall on either side of the log. I layered on the pieces until I was able to slide the aluminum on these walls without bumping the log.
Step 4: Make the Sled
I drill holes in the aluminum and screwed on pieces of plywood to make a sled that would slide over the leg and cradle the palm router. I made sure to check that the blade in the router could not bump into the aluminum.
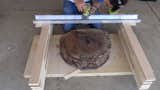
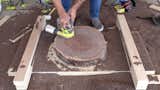
Step 5: Flatten the Log
I turned on the router and started sliding it back and forth in the sled and slowly worked my way across the surface of the log. I removed about ¼" of material and then removed strips of Masonite that lowered the sled by ¼" and repeated the process.
Step 6: Flip and Repeat on the Other Side
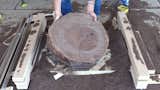
Once I got the first side flat I used a putty knife to scrape away the hot glue and flipped the log over before gluing it back down with my hot glue gun.I didn’t need shims this time since the first side was now level. I repeated the process of making multiple passes with the routers and lowering the sled by removing strips of plywood and Masonite.
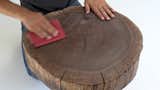
Step 7: Sand the Table Top
I used an orbital sander to sand down the top and sides of the table top.
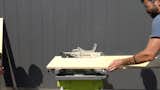
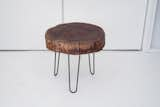
Step 8: Screw on Legs
I placed some rags down and flipped over the table top and screwed on some hairpin legs. I predrilled the holes before adding the screws to prevent the wood from splitting.
Step 9: Finish the Table
I applied some wipe on poly to the walnut. I used a brush but have recently learned that a rag works better. I sanded in between the coats and added 3 coats total.
Published
Last Updated
Topics
DIYGet the Dwell Newsletter
Be the first to see our latest home tours, design news, and more.